First start the Snipping Tool application; it’s in your accessories folder. You can also just click on Start and type in snipping. For a more in-depth look at the Snipping Tool and other screen capture methods, check out our post – Ultimate Guide to Taking Screenshots
Using the Snipping Tool
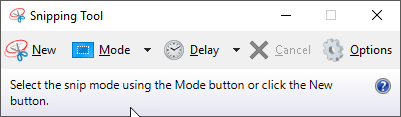
When the Snipping Tool application starts and you click New, your screen will become cloudy and the Snipping Tool popup application screen shown below will appear.
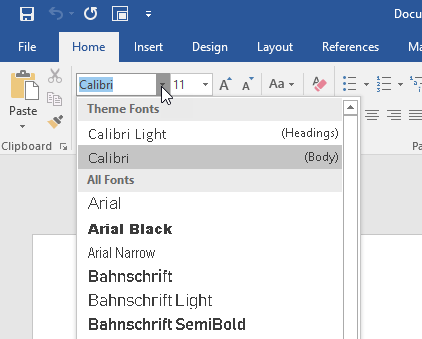
Normally at this point, you’d draw a rectangle or a freehand sketch (depending on the Mode you choose) to start capturing whatever you’re after and the results would appear in the Snipping Tool window. Instead, press the ESC button on your keyboard. Your screen should immediately clear up, looking like nothing is happening, except that the Snipping Tool popup application should still be visible. Don’t worry, this is normal. Next go to your application that has the popup menu that you’re after. In this case, we’ll capture the font popup menu that drops down when you click on the Current Font display in Word. Click on the Current Font to make the font window drop down.
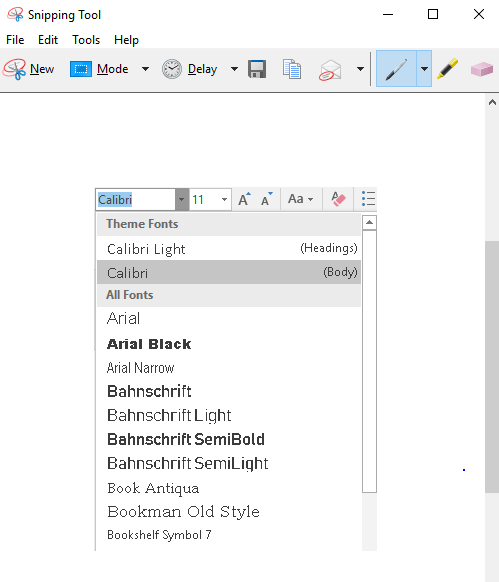
Next, press the Ctrl – PrintScr combination on your keyboard (press and hold down the Ctrl key while reaching for and pressing the Print Scrn key; then let go of both keys simultaneously). The screen should immediately go cloudy again. This time though the popup menu should still be visible on the screen. To capture the drop-down menu, click at the corner of where you want to capture your image, then hold down the mouse button while you move to a new position, drawing a rectangle around the part of the screen you wish to capture, then let go. As soon as you do, the part of the screen you’ve captured will pop up in the Snipping Tool application window where you can save it and then do with it whatever you wish. It should look something like this:
You can also use this method to capture any right-click context menus in Windows. The method above works well, but you can also use a different method that involves adding a delay. Simply click on the Delay button and give yourself a few seconds before the capture begins.
In those few seconds, you can go open the popup menu or right-click menu and then just wait till the screen capture starts. Enjoy! Note: You can also draw or capture your image via Free Form, Window or Full Screen shot when snipping your image by clicking the down arrow next to the Mode button on the Snipping Tool screen.